Most aspiring filmmakers think they will figure out how to shoot a scene after they are on set and everything is ready. But if you want to become a professional filmmaker, you have to learn otherwise. Today I will share with you some of the things I learned the hard way over the past 10 years on how to shoot a dialogue scene.
Welcome back. If you are new here I’m Ashik Satheesh, a writer and filmmaker from Kerala, India. On this website, we make the world a better place learning to tell one great story at a time. A dialogue scene is one of the most common scenes you will come across in any film (any film on humans that is). So learning to shoot a dialogue scene ensures that you can shoot almost any film.
View this post on Instagram
This dialogue scene from Munnariv, this circular shot of two people talking, was noticed by everyone who saw the film. But for me, it is a failure. Why? How do I say that this dialogue scene is a failure? You will figure out in this video.
Disclaimer: What I am sharing here is what I learned from my experiences. None of these are to be taken as rules, but only guidelines.
If you want a video or podcast version of the same in Malayalam, check here.
1. What is the Purpose of the Dialogue Scene
To know how to shoot a dialogue scene you should first know what is the purpose of that scene. Every scene in your script should be serving a purpose. What is that purpose? The purpose of any scene is the same, to push the story forward. In the excitement of making a film, most filmmakers starting out forget that very important aspect.
There is a simple way to know if a scene is moving the story forward. What you have to do is cut that scene out completely. Does your story hold firm still? Are there no holes in the plot or character? Then, that scene should be cut.
A conversation that doesn’t help deepen the audience’s understanding of the character, or one that doesn’t move the plot forwards, has no place in your screenplay. The same applies to every single line of dialogue as well. We’ll talk more about that in an episode dedicated to writing.
1.1 Why Purpose
Why is it important to know the purpose of a dialogue scene, or any scene for that matter? It is important because without knowing the purpose, you have no direction. Without a direction, how do you know which shot is right? In a mathematics problem, you can have only two options—a right answer and a wrong answer. But writing and filmmaking is art. There are no right or wrong answers. You are its creator. You choose what is right and wrong for it.
But like we talked about in our previous post, if you want to be fed, you have to learn to say “I want apple” and not “want apple I”. If you want people to understand what you are trying to say, you have to tell them in a way that they can understand. For that, you have to first know the purpose. In wanting an apple your purpose was to satisfy your hunger. In wanting to do a scene in a particular way, your purpose is to convey an emotion, a thought, or an idea to the audience.
Then the only way to know how to shoot a dialogue scene is by knowing what you believe and understand as the purpose of the scene. This is why the purpose of a scene is important. Once you know the purpose, now you can prepare to shoot that dialogue scene.
2. Preparing to Shoot a Dialogue Scene
This is the fun part. Figuring out the purpose and how it fits into the whole film and such stuff are hard time-consuming work. Now all you have to do is just sit back relax and imagine.
2.1 Imagine
One of the first things that you need to do is let your imagination run free. Read the dialogues. Read the action. Observe how the written words inspire visuals in your head. If the writer is any good then their writing will inspire visuals in your head.
The way you imagine a scene will depend on all the films that you have ever seen in your lifetime. It also depends on the shots that you have practised. Let your mind free. You don’t have to know how to shoot that crazy imagination of yours right now.
“When I’m writing I take my director’s hat off. I then come to as a director and I have no idea how to do this. I’ve no idea what this will look like, how to visualize it. That is when you know you’re challenging yourself.”—Christopher Nolan, How Christopher Nolan Develops Story Ideas, Karachi Film School
2.2 Storyboard
Once you have imagined the scene in its entirety now it’s time to put the ideas on paper. Take a blank piece of paper and roughly sketch out the images you saw in your head. We already talked about the multitude of shot types that you have at your disposal in a previous post. Check here for a refresh.
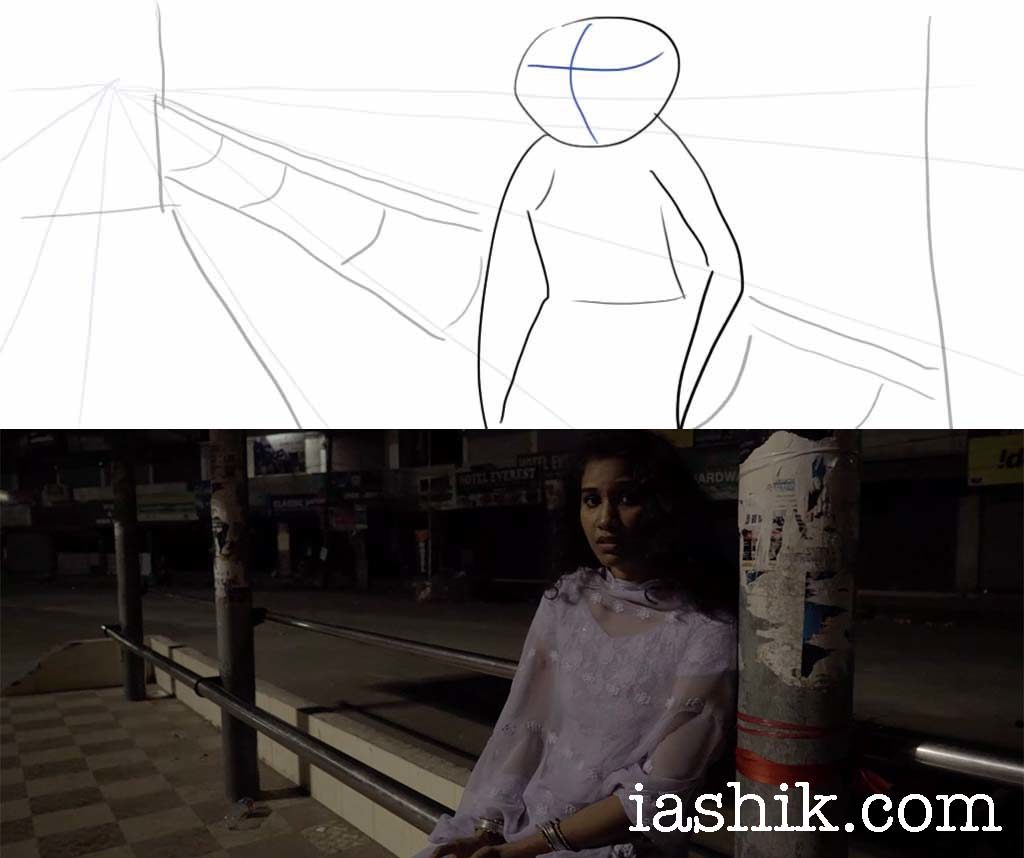
Use stick figures. You don’t have to have any special artistic talent. Trust me. I don’t. Here, look at a frame from an old storyboard of mine (and how it turned out in the film).
What a storyboard helps you do is turn the vague ideas in your head into something concrete. You can also create what is known as a Shot List, where you list down all the shots. Storyboards or Shot List, it is all about communicating your ideas with the actors, the cameraman, and so on. Only when you have your ideas down on paper (or screen) will they get an idea of the image that you want to create and create it for you and help improve it. It helps them work better. It also helps you figure out if the footage will cut well together later. Once you have your vision on paper, now you can bring life into the scene with actors.
2.3 Rehearse The Dialogues Scene with Actors
Work with the actors. Here again the scene’s purpose comes in handy. Talk to them about the purpose of the scene that you identified. It helps them understand their character better. Show them the shortlist or the storyboard that you have made. Let them learn the dialogues. Let them work off of each other, while you guide them to bring out the scene to life.
Seeing the actors bring life into the dialogues will inspire you to come up with new camera angles and frames. It always happens. The shot list and the storyboard you made earlier was to help you think, to be a guide to communicate your idea. It is not to be set in stone. Let the process influence you. You might also have to make adjustments to the dialogues. Some things might have worked well on paper, but not when spoken out loud. Let all the new inspiration guide you to make something better.
If you have identified the purpose of the dialogue scene, imagined it in all possible ways, identified the shots you want, rehearsed the scene with the actors, you are now ready to shoot the dialogue scene.
3. How to Shoot a Dialogue Scene
You have now shot your dialogue scene even before you ever came on set. What remains is to go on set and capture the footage.
3.1 Shooting the Dialogue Scene
Once you are on set, forget setting up lights, or capturing good sound or having a colour coded set, for now, I mean. Focus on developing your skill on one element of filmmaking. Once you feel you can shoot any dialogue scene, you can then go on to the next step, whichever it may be for you.
Take the first shot in your list. Place the camera in the room you have chosen. Position the actors according to the storyboard. Roll camera and action! Shoot as long as you want. Look at your shot list and see if there are other shots from that same angle, say a medium shot or a closeup for a specific dialogue. Once you have all the dialogues from that angle, move the camera onto the next position, and so on.
Fun fact: When you are doing a closeup or a medium shot of one actor, the off-screen actor need not even be there beside your camera. You or an Assistant Director (AD) can stand-in. Sometimes nobody needs to stand in if the actor is an experienced one.
As you have realised by now, shooting is the smallest part of how you shoot a dialogue scene. Most people starting do not think of it this way. They go on set and then try to figure out how to shoot. Which is okay when you are learning. But on a professional set, where time is money, you have to learn to shoot everything you need within the time you have.
3.2 Rules of Shooting a Dialogue Scene
If you have been on YouTube long enough searching for filmmaking, then you would probably have come across rules of shooting a dialogue scene such as “the 180-degree rule”, crossing the eye-line, and so on. If you have no idea what those mean, then you don’t have to know any of it now. There are no rules in art, but only guidelines. What you need to focus on is in developing your craft.
Right now you were prompted to read this because you had a question in your mind, how to shoot a dialogue scene. When you have shot a couple of scenes, then you will start seeing things that might not be working. For example, one of the questions you might have is how to maintain continuity when transitioning from one shot to another. You can watch that video now and learn, but it will make the most sense to you once you have experienced what goes wrong without continuity. You can then search for answers to those. You’ll find them, trust me. But now is not the time. There is a time for theory, a time for practice. Now it is time to practice. If I can do it, you can.
Concluding
How do you shoot a dialogue scene?
- Find the scene’s purpose
- Imagine the scene
- Storyboard it
- Rehearse with actors
- Shoot it and practice
It is entirely up to you! In case you are still wondering why the revolving scene from Munnariv didn’t work, I will give you a clue. It has to do with the first reason, the purpose. What was the purpose of that scene? Shoot your guesses in the comments. I’ll pin the right one.
If you liked this article, then share it with your aspiring filmmaker friends.